The aim of this article to set up and configure a Meross Wi-Fi switch (I’m using an MSS310) with OpenHab2 to work in offline mode — with MQTT and no dependency on the Meross online services.
I gathered most, almost all, of the information required from this thread on github Offline-ONLY support.
For this article, you need to be comfortable with the command line, and have git and node.js installed; you should already have an OpenHab2 setup.
Configure an MQTT server
There are many articles online showing how to configure MQTT and OpenHab2, I recommend
- https://www.smarthomeblog.net/mqtt-openhab/ or
- https://www.openhab.org/blog/2018-12-16-mqtt-arrives-in-the-modern-openhab-2-x-architecture.html
However, one more step is required; the Meross switch requires a secure MQTT server. I followed this guide:
Configure the Meross switch for your Wi-Fi and MQTT server
Get the meross tools, from your command line
git clone https://github.com/bytespider/Meross
cd Meross/bin/src
npm i
Plugin your Wi-Fi switch.
If it’s not your first time using the switch, press and hold the power button for 5 seconds. Connect to its Wi-Fi access point (Meross_XXX)
Configure the switch for your Wi-Fi and MQTT Server
from Meross/bin/src directory
./meross setup --gateway 10.10.10.1 --wifi-ssid <your-ssid> --wifi-pass <your-pass> --mqtt <mqtt-host-ip>:8883
At this stage, you may hear some clicks from the switch. You can also verify that it has connected using the mosquito logs:
1595295630: New client connected from 192.168.30.7
You should also see some messages from the new switch:
/appliance/1712281825467829030134298f151c4a/publish {"header":{"messageId":"7c2834f83f9cc5b1c7ae1049280a9f3f","namespace":"Appliance.Control.ToggleX","method":"PUSH","payloadVersion":1,"from":"/appliance/1712281825467829030134298f151c4a/publish","timestamp":1557534775,"timestampMs":955,"sign":"f07e2a7ab622997508d359cb89c74038"},"payload":{"togglex":{"channel":1,"onoff":1,"lmTime":1557534775}}}
Note the appliance ID in bold above.
On my Mac, I also used MQTT Explorer to view the messages and to determine the appliance id.
Add the switch to Openhab
Add a new thing.
-
Using the Paper UI as a new thing.
- Inbox / “+” on the top of the screen.
- Select MQTT Binding.
- Manually Add Thing
- Select Generic MQTT Thing
- Give your thing a name, and select your MQTT bridge (configured from step 1).
-
Add a Channel
- On/Off Switch
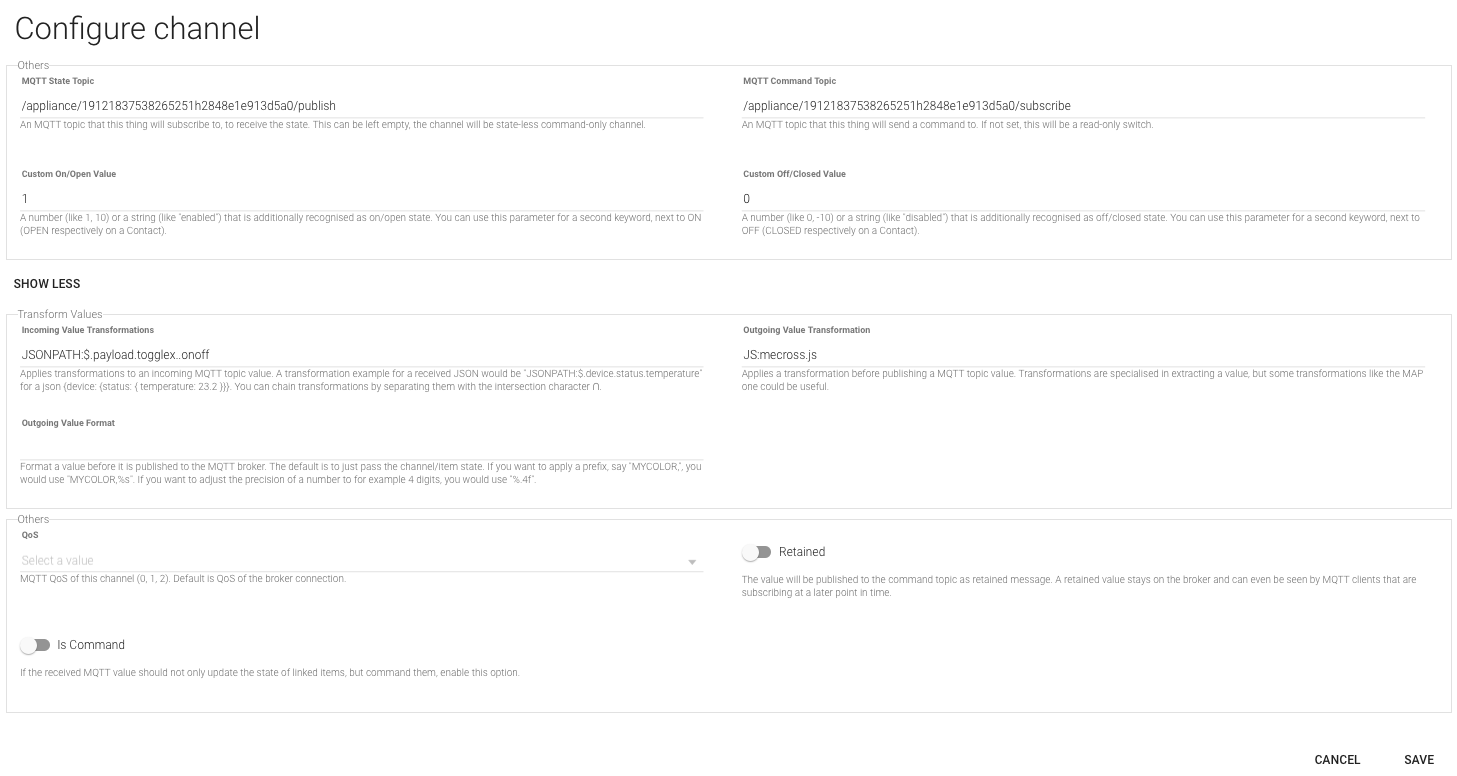
- The settings are as follows:
- MQTT State Topic:
/appliance/<appliance_id>/publish - MQTT Command Topic:
/appliance/<appliance_id>/subscribe - Custom On/Open Value:
1 - Custom Off/Closed Value:
0 - Incoming Value Transformations:
JSONPATH:$.payload.togglex..onoff - Outgoing Value Transformation:
JS:meross.js
- MQTT State Topic:
Finally, download the following file, meross.js and save it to your transform directory, for me this is /etc/openhab2/transform/.
The meross.js file creates the JSON structure required to control the switch.

Link the new thing to an item.
Select the new channel, and link it to an exsiting or new item.
Last modified on 2020-08-04